Explication du Service Dyndns
Le service Dyndns (service DNS dynamique) s'adresse aux particuliers et aux entreprises. Il peut être utilisé dans plusieurs domaines :
- Hébergement de site internet à votre domicile.
- Hébergement des applications serveurs : FTP, VNC, etc.
- Utilisation d'une caméra internet de surveillance (caméra IP) : visualisation, administration, etc.
- Hébergement et utilisation des applications nomades sur les téléphones mobiles.
- Fixation virtuelle de votre adresse internet (adresse IP) pour l'administration et la gestion de vos applications à distance.
- Gestion et administration des appareils domestiques connectés à internet : chauffages, caméras, éclairage, communication, etc.
Dans tous les cas, un enregistrement d'un sous-domaine internet ou d'un domaine internet est nécessaire. Ce nom de domaine permet la liaison avec l'adresse internet de votre routeur et/ou votre PC.
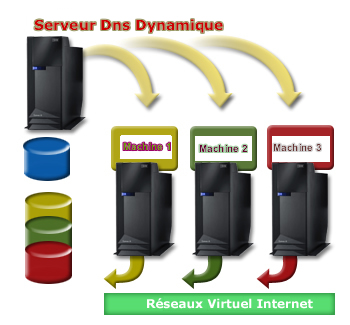
En gros, le service Dyndns vous permet soit d'utiliser un serveur, soit de prendre le contrôle de votre PC à distance.
Si vous possédez une connexion internet haut débit de type ADSL, câble ou autre, vous pouvez utiliser le service Dyndns.
Étapes à suivre :
- Inscription
- Allez à l'espace client et connectez-vous.
- Choisissez le menu "Création Dyndns" et créez votre compte Dyndns.
- Téléchargez le client Dyndns pour l'installer sur votre PC.
- Installez le client Dyndns sur votre PC.
- Configurez votre serveur web ou FTP.
- Configurez votre routeur si vous en avez un : configurez le NAT (Network Address Translation) pour permettre aux connexions entrantes vers les ports de vos serveurs installés (port 80 pour le web, 21 pour FTP, etc.).
- L'accès à vos serveurs internet s'effectuera alors à distance via le nom de Dyndns choisi.
Pourquoi choisir DynDNS ?
DynDNS est la solution idéale pour les utilisateurs ayant une adresse IP dynamique. Il vous permet de :
- Héberger vos sites web et applications à domicile.
- Surveiller votre domicile à distance via des caméras IP.
- Contrôler vos appareils domotiques (thermostats, éclairages, etc.).
- Accéder à vos serveurs et applications depuis n'importe où dans le monde.
Avec DynDNS, vous n'avez plus besoin de vous soucier des changements d'adresse IP. Notre service met à jour automatiquement votre domaine pour qu'il pointe toujours vers la bonne adresse IP.